


Happy Halloween!
I am always looking to reuse weird materials in my makerspace. Biking to work this fall, I started wondering… How hard it would be to laser cut a leaf?
Experimenting with new materials in your laser cutter is a pretty easy process, based on some educated guesses and some testing and iteration. Teachers can follow this guide on their own to make decorations for their students, or as a class project where students get to do the material testing.
.jpeg)
Materials
My first step was collecting some fallen leaves. We have an American Elm tree growing in the parking lot, so I started with some research. I couldn’t find much information about laser cutting leaves, so instead I researched if the leaves were safe to burn. My research confirmed what I assumed – laser cut leaves shouldn’t release any noxious fumes. Our Beam Air ventilation system works wonders, but you can never be too careful.
When laser cutting, you want your materials to be as flat as possible. I selected about ten leaves that seemed extra flat, and then pressed them in a textbook for a few minutes to be sure.
Note: While laser cutting, some of my leaves did curve up and the edges got caught onto the laser head. As the laser cutter moved along, the leaf got dragged with it, which messed up the layout of my file. Not a safety hazard, just an inconvenience.
Design
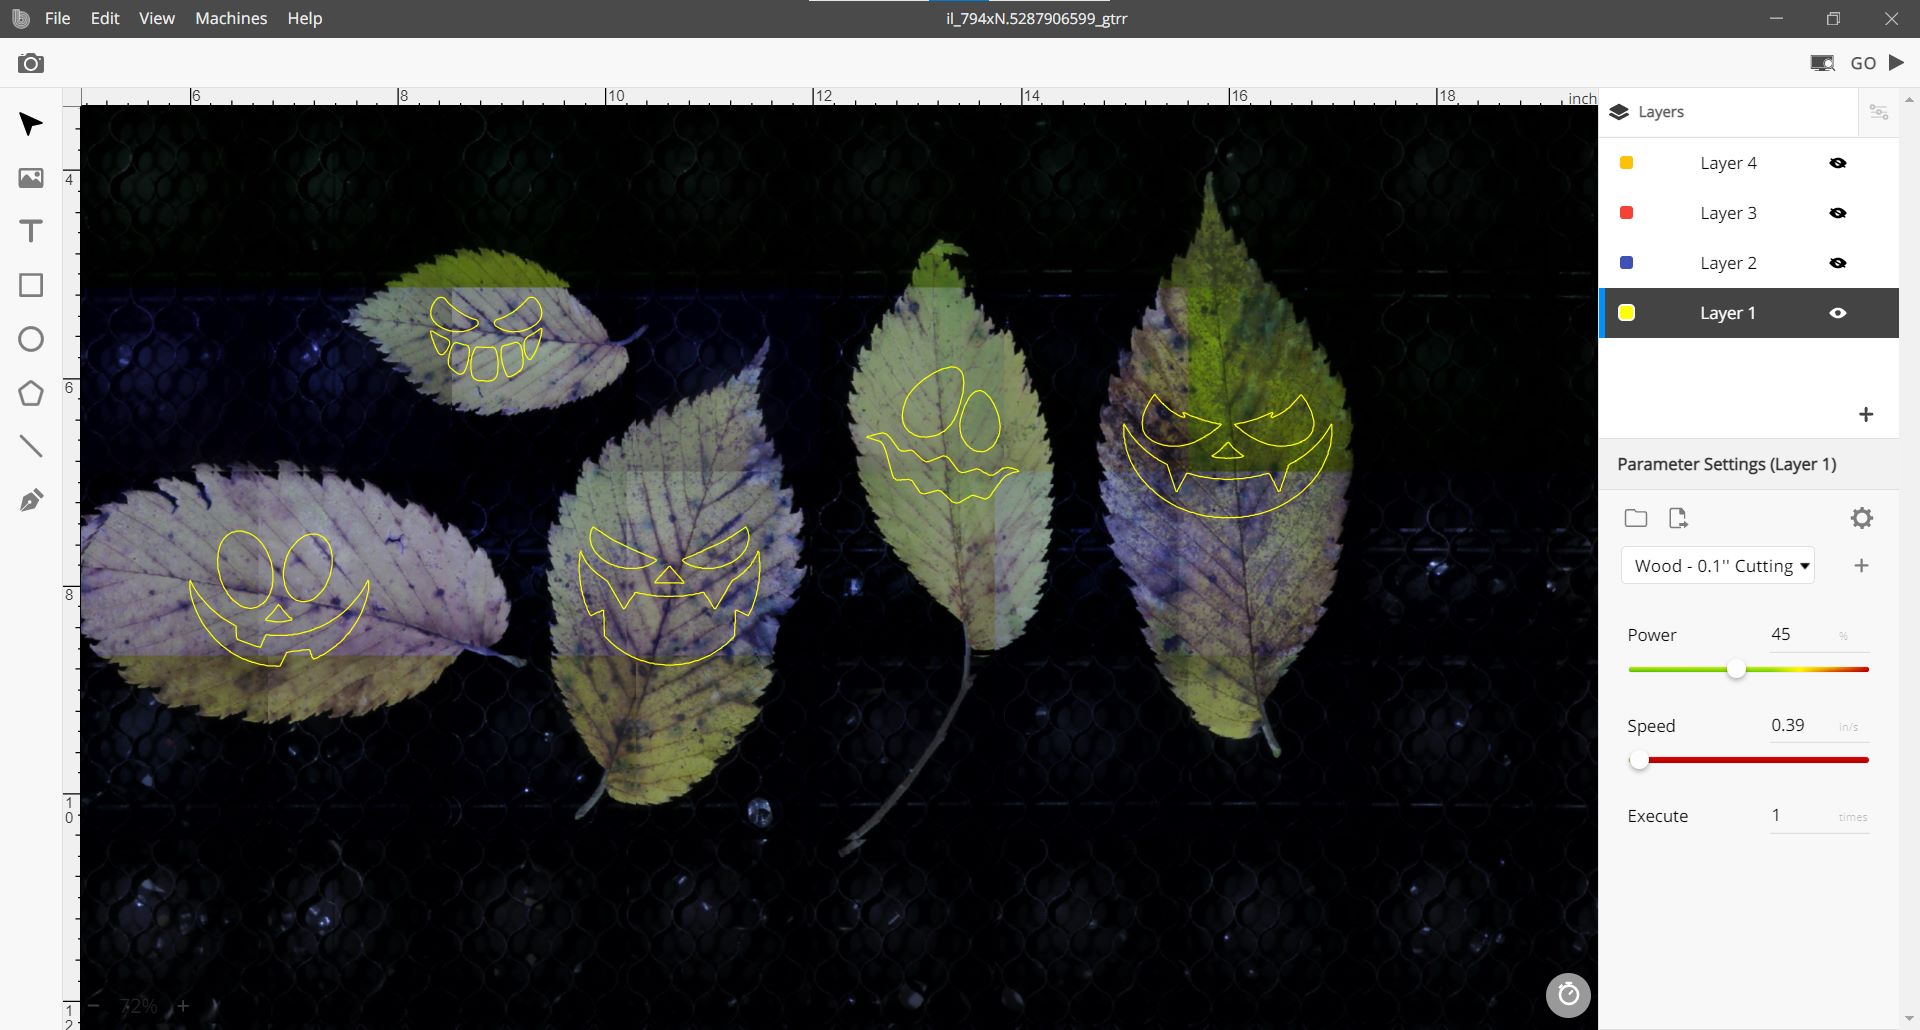
I found some spooky faces on Google Images and thought they would look good on my leaves. I started by downloading the file as a PNG. I uploaded the file into Beam Studio, and turned off the Gradient in the right hand column. I used the slider under the Gradient setting to adjust the image slightly. Next, I used the Image Trace Function, also in the right hand menu, to transform my bitmap image into a vector. I turned off Infill and decomposed the image, which is now made up of vectors for each component in each face. I grouped each face back together to stay organized. You can feel free to use my .beam file or design your own spooky faces for your leaves!
I’m using our 60W HEXA Laser Cutter for this activity. I placed all my leaves on the honeycomb bed, focused the laser beam using the Autofocus button, and went back to Beam Studio to scan the bed. I positioned each face on one of my leaves, scaling and rotating them so they looked just the way I wanted.
.jpeg)
Cutting
Cutting is always the tricky part of experimenting with new materials. I started with the preset Fabric 0.1” - Cutting (15% power, 0.95 in/s speed) parameter in Beam Studio, which is my go to when I cut a super thin material. I am always super careful when cutting a new material because I don’t want to overestimate the settings and cause a fire, so fabric (which is made of natural fibers, is lightweight, and thin) seems like a good match to the feeling and thickness of a leaf. This process is guess and check, so if you have a thicker leaf that reminds you more of leather than of fabric, try the leather setting! If you are feeling nervous before you get started, learn more about cutting unique materials through this lesson our team wrote in collaboration with Flux Laser Cutters.
I cut just one face at first, so as not to waste all my materials immediately. I watch the first face as it cuts in case anything unusual happens, thankfully nothing does and my first face cuts out pretty well. The leaf smells a little overly burnt, but the cutouts are still connected to the leaf because the midrib and veins are denser than the lamina of the leaf.
My second test I decided to use Wood 0.1” - Cutting (45% power, 0.39 in/s speed), just to see what would happen. The burning smell increased but the laser cutter still didn’t quite cut through the midrib. I think bumping the power up to 55% might have done the trick, but I didn’t want to risk burning the lamina, and truthfully it’s not so annoying to cut the veins with a pair of scissors.
My third test I pulled the power way down to see what the lower limit might be. I tested 15% power, 5.5 in/s speed, and unsurprisingly the laser cut through the lamina and didn’t cut through the midrib or the veins. I had to do more cutting by hand with this lower setting, so I decided to go back to the fabric range, ultimately settling on (25% power, 0.95 in/s speed) for the rest of my spooky leaves.
Did you make spooky leaves with your students? Post your results on Instagram and tag @fluxspace.io or email us at info@fluxspace.io for a chance to be featured on our website!
.jpeg)
.jpeg)
Project Examples
Have a solution to this challenge you want to share? Take a photo or video of your prototype, post it on social media, and don’t forget to tag us @fluxspace_io


